Tampilkan postingan dengan label Tried & Tested By Readers 读者试过都说好. Tampilkan semua postingan

Basic White Bread 基本面包/原味吐司 (面包机食谱)


A super easy, mess-free and straightforward basic white bread recipe of your dream. This recipe is suitable for people who have never tried baking bread at home and it's perfect for busy parents. Just add all ingredients into Song Cho bread maker and let it do the kneading and baking. The next time you open the lid, the bread is ready. Seriously, nothing beats the smell and taste of freshly homemade bread.


Ingredients:
材料

200g Fresh Milk 鲜奶 200克

25g Castor Sugar 细砂糖 25克

1 tsp Salt 盐 1克

20g Unsalted Butter 牛油 20克

300g Bread Flour 高筋面粉 300克

1 tsp Instant Dry Yeast 即溶酵母 1克


If you are sharing this recipe/ blog content, kindly attach the link to this blog instead of screen capture/ copy & paste/ use in your blog. No parts of the content of this blog may be reproduced without prior written permission. All rights reserved. Thank you. 

如果您要分享此食谱/内容,请联系这个部落格的相关链接。敬请不要复制或改篇为自己的食谱。谢谢!


Method: 步骤

1. Take out bread barrel from Song Cho Bread Maker. Install the stirring rod. Add Milk > Butter > Sugar > Salt > Flour > Yeast into bread barrel. 
将牛奶》糖》牛油》盐》面粉》酵母》跟次序放入松厨面包机。


2. Return bread barrel into Song Cho bread maker, press bread barrel down, turn it by clockwise and make sure it is installed firmly. Press < MENU >, select <#2 BASIC > , press < START >.
安装好后按键《MENU》,选择 《#2 BASIC 》,按 《START》。


3. When the bread is ready, beep sound 10 times and it turn into keep warm status automatically. The longest time of keeping warm is 1 hour. Press <STOP> button for 3 seconds, it stop keeping warm so that you could take out the bread. 
面包烘烤完成后面包机会响10声。面包机会自动保温长达一小时。持续按键《STOP》三秒钟停止保温,即可拿出面包。

4. Transfer the bread on a cooling rack. When it's completely cooled, slice and serve.
待凉后享用。若喜欢我的食谱,可以LIKE和追随我的面书专页,不要错过最新食谱发布。


If you like my recipe, click hereLIKE & Follow Miki's Food Archives Facebook page to receive more recipe updates. Don't forget to change the setting to 'SEE FIRST' if you wish to see my post on your Facebook news feed. Enjoy!

~ Special thanks to Song Cho Singapore ~ 

By readers, some feedback from those who have tried this recipe:

By Charlene Sim


SaveSave
SaveSaveSaveSave

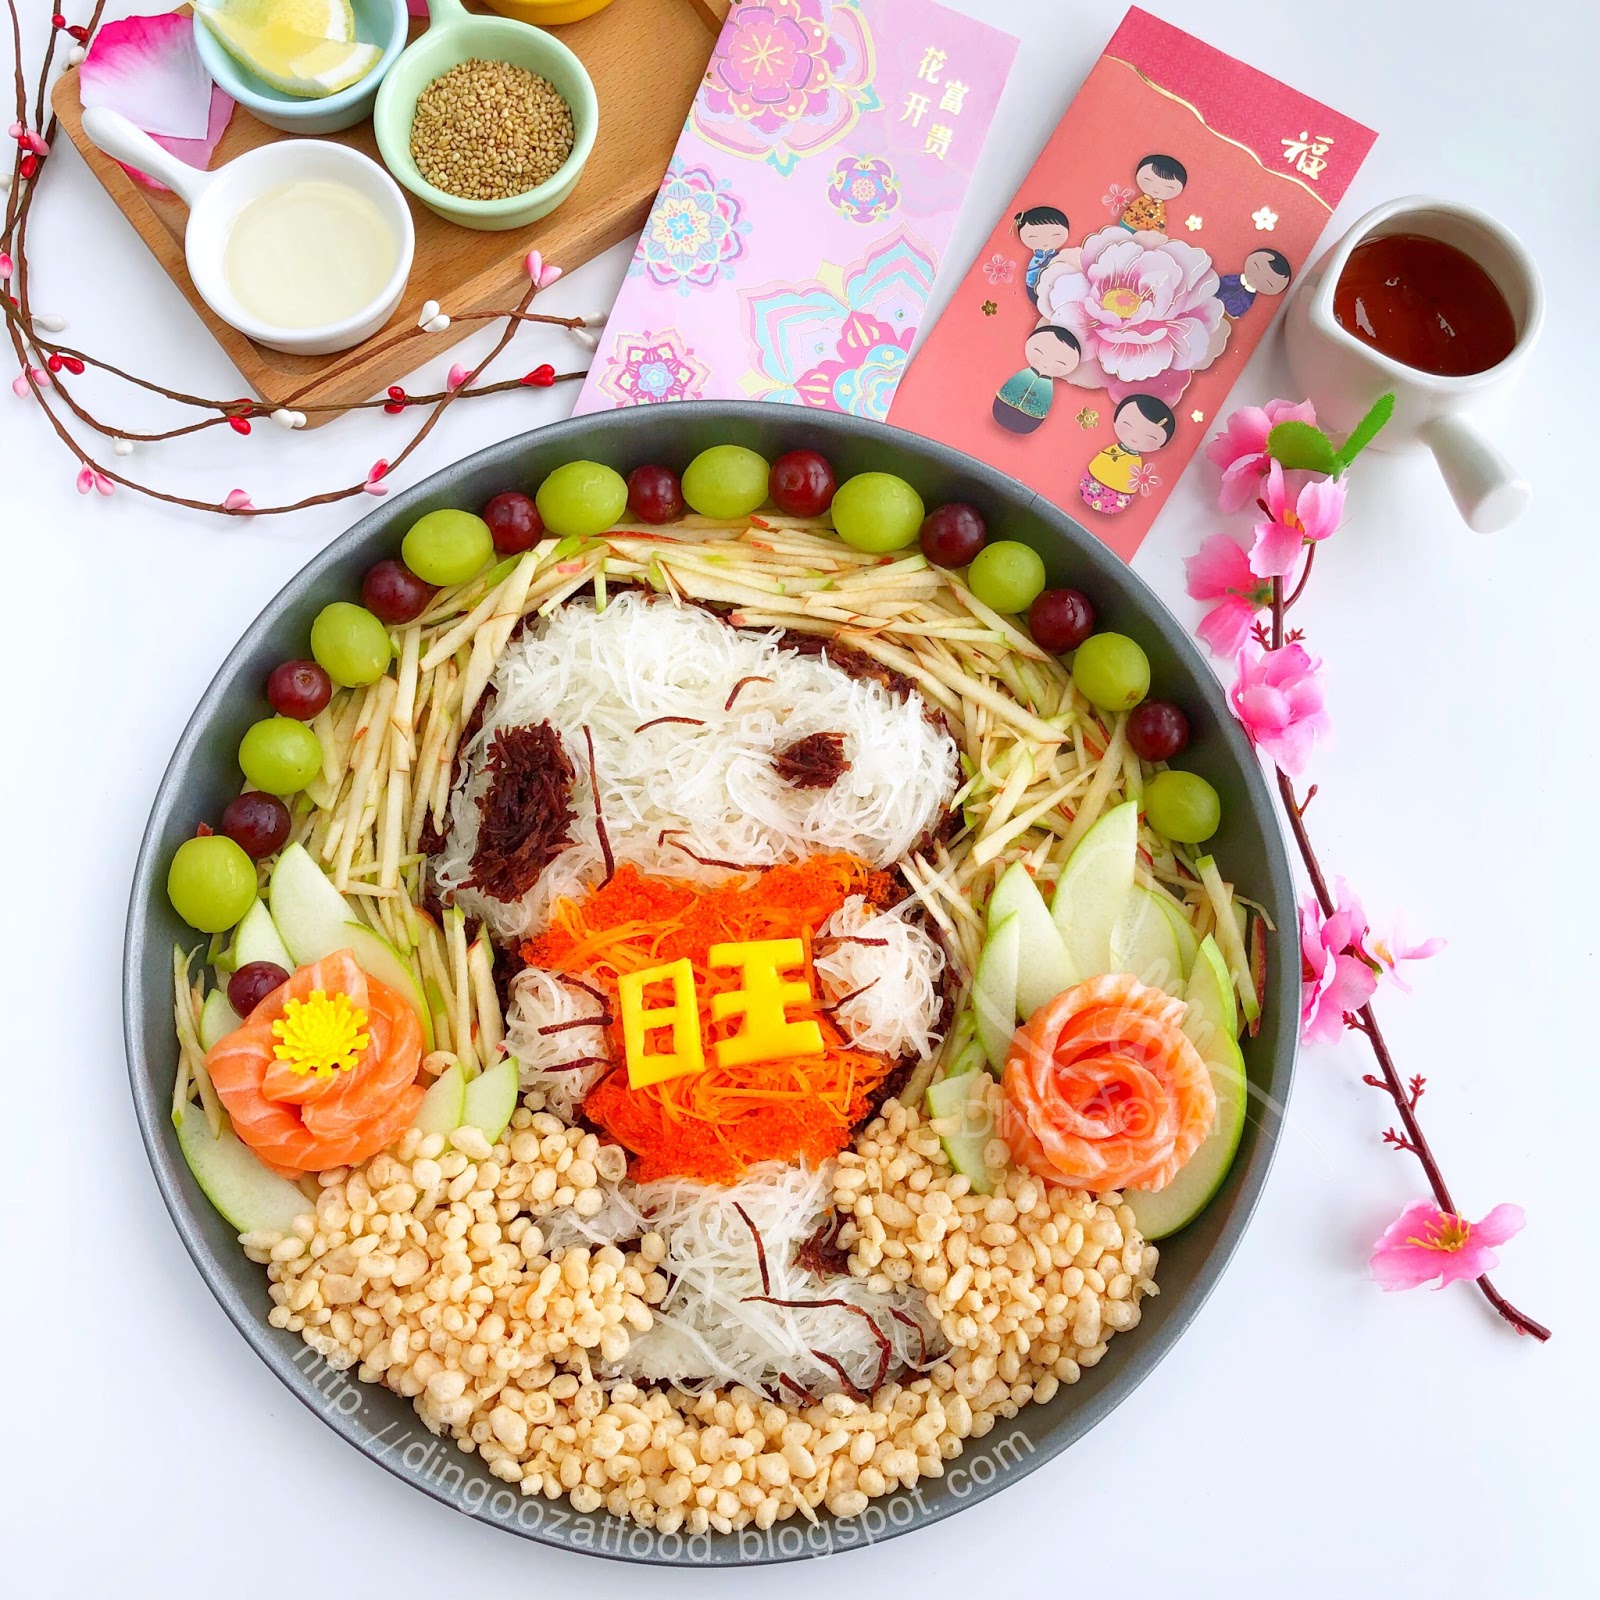
Fruity Salmon Prosperity Toss aka Yu Sheng/ Lo Hei 水果三文鱼捞起


A fruity twist to the usual Chinese New Year Yu Sheng salad, made creatively with fresh fruits and sashimi grade salmon. Added some shrimp Tenkasu for the crunch. Looks good, taste great!


This was my first ever DIY Yu Sheng made in 2018, year of dog. And that is why you see the cute little Snoopy dog smiling happily on the plate. 


Me and my 阿旺 food art. :)


Ingredients:

中文食谱:请在网页右边点击Translate选择中文翻译

8 slices Sashimi Grade Salmon

Some Tabiko (for garnishing)

280g Japanase Daikon/ radish (shredded)


The first 3 ingredients that I got from Emporium Shokuhin.


1 Red Apple (shredded)

1 Green Apple (shredded)

1 Green Apple (thinly sliced)

1 Orange Carrot (shredded)

1/4 Purple Carrot (shredded)

10 Red Seedless Grapes

10 Green Seedless Grapes

1 slice Mango

1 cup Shrimp Tenkasu 
(can be replaced with Bok Chui crackers)


Other Condiments: 

2-3 tbsp Plum Sauce

1 tbsp Toasted Sesame Seeds

2 tbsp Toasted Ground Nuts

1/2 tsp White Pepper

1 tbsp Ground Nut Oil 

1 tsp Lemon Juice


If you are sharing this recipe/ blog content, kindly attach the link to this blog instead of screen capture/ copy & paste/ use in your blog. No parts of the content of this blog may be reproduced without prior written permission. All rights reserved. Thank you. 

如果您要分享此食谱/内容,请联系这个部落格的相关链接。敬请不要复制或改篇为自己的食谱。谢谢!

Method:

1. Made Snoopy character with Daikon. 


2. Add facial details and outlines using purple carrot. Made heart shape using orange carrot.


3. Cut mango into the auspicious character 旺  or just cut into cubes.


4. Place the mango on the shredded carrot.


5. Place 4 slices of salmon as shown in the picture below, roll up to make the flower. Repeat for the rest.


6. Assemble with the rest of the ingredients. Add some Tabiko on the shredded carrot to give it a nicer colour.


7. To serve, add in condiments, toss up high and enjoy! 恭喜发财 Happy New Year!

If you like my recipe, click hereLIKE & Follow Miki's Food Archives Facebook page to receive more recipe updates. Don't forget to change the setting to 'SEE FIRST' if you wish to see my post on your Facebook news feed. Enjoy!

By readers:

By Vera Lim

No-Bake Lychee Cheesecake 免烤荔枝奶酪蛋糕


No-Bake Lychee Cheesecake 免烤荔枝奶酪蛋糕 - Pureed Lychee gives this cheesecake a light and soft texture with subtle tropical fruit flavour and it goes brilliantly with the buttery digestive biscuit base. This perfectly lite sweet melt-in-mouth creamy cheesecake is wonderfully delicious and sensational! 


I have been wanting to do this for the longest time and I'm happy that I finally made it for this special occasion - my husband's birthday. 


He is the guy who never appreciate fancy decorated cakes, so what I did was as simple as possible. Just placed some leftover lychees and lustred gooseberries on top and that's all for a simple yet elegant Lychee Cheesecake. 


The taste was absolutely good, both the husband and son loves it and gave 2 thumbs up! :)


中文食谱:在网页的右边点击Translate,然后选择中文翻译
中文食譜:在網頁的右邊點擊Translate,然後選擇中文翻譯


Ingredients:


Crust:

150g Digestive Biscuit, finely crushed

60g Butter, melted


Filling:

250g Cream Cheese

200g Whipping Cream

50g Plain Yoghurt 

125g Lychee Puree (blend canned lychee into puree)

1 tbsp (full) Gelatin Powder

50g Water

80g Icing Sugar (can be reduced to 65g for less sweet cheesecake)

1/2 tbsp Lemon Juice

Cake pan: 7 or 7.5" round removable base. 


If you are sharing this recipe, kindly attach the link to this blog instead of screen capture/ copy & paste/ use in your blog. No parts of the content of this blog may be reproduced without prior written permission. All rights reserved. Thank you. 

如果您要分享此食谱,请联系这个部落格的相关链接。敬请不要复制或改篇为自己的食谱。谢谢!


Method:

Crust:


1. Combine digestive biscuit and melted butter. 


2. Spread onto the cake pan and press down with the back of a spoon (or with cleaned hand). Refrigerate till set, at least 1 hour.


Filling:

3. Measure water into a bowl and sprinkle in the gelatin (without stirring with a spoon). Set aside for 10 minutes. 


4. Place bowl in a larger pot of hot water. Once the gelatin melts, remove from heat and set aside to cool to room temperature. 


5. Meanwhile, beat cream cheese and half of the icing sugar together until smooth and creamy. 


6. In another mixing bowl, beat whipping cream and the remaining icing sugar until stiff. 


7. Combine lemon juice and lychee puree. Stir in gelatin to lychee puree.


8. Add yoghurt into cream cheese mixture, mix well. Fold in lychee puree and whipped cream.


9. Pour the mixture into the chilled crust. Refrigerate overnight or until set. Remove cheesecake from the cake pan and serve chilled. Tap the link below and watch the video tutorial of how I remove my cheesecake from the pan, the easy and perfect way! If you like my recipe, click hereLIKE & follow Miki's Food Archives facebook page to receive more recipe updates. Don't forget to change the setting to 'SEE FIRST' if you wish to see my post on your Facebook news feed. Enjoy!

Watch video tutorial


Some feedback from those who have tried this recipe:

By thegrumpyrabbit

By Mandy Kee


Stir Fry Clam In Oyster Sauce 香炒蚝汁啦啦/蛤蜊


Stir Fry Clam In Oyster Sauce 香炒蚝汁啦啦/蛤蜊 - Clam meat is tender, delicate and easy to cook as it pick up flavours quickly. They are perfect for stir frying in a good quality wok - Song Cho Ideal Wok, that's what I used to stir fry these flavourful, juicy and delectable clams. 


The IDEAL Wok is a flat based stainless steel wok that can be used to do more than just simple stir-frying. It is a multiply stainless steel wok without chemical coating, so it's safe to use in any cooking and deep frying. 

Thanks to Song Cho Singapore for sending this wok to me. :)

FEATURES:
  • - Multiply stainless steel
  • - Lightweight
  • - Multi-functional (use as a hotpot; pan-fry, stir-fry & steam)
  • - Suitable on various types of cooker (gas, induction, infrared, ceramic, electric, oven)
  • - Energy saving
  • - Economically effifient
  • - Environementally friendly


Ingredients: 
材料


1 kg Clam 啦啦/蛤蜊 1公斤

2 tbsp Salt 盐 2汤匙

2 litre Water 水 2公升(可以用清水或米水)


30g chopped Shallot 小葱头 30克,剁碎

1 chopped Red Chili/ Bird's Eye Chili 红辣椒/指天椒 1条,剁碎

20g chopped Garlic 蒜茸 20克

1 tbsp chopped Ginger 姜碎 1汤匙


1 tbsp Oyster Sauce 蚝油 1汤匙

1 tbsp Shao Xing Hua Tiao Wine 绍兴花雕酒 1汤匙


2 tbsp chopped Spring Onion 青葱碎 2汤匙


If you are sharing this recipe, kindly attach the link to this blog instead of screen capture/ copy & paste/ use in your blog and claimed as your recipe! Thank you. 如果您要分享此食谱,请联系这个部落格的相关链接。敬请不要复制或改篇为自己的食谱。谢谢!


Method: 
步骤

1. Pour water and salt in a large bowl, add in clam, let it soak for 2 hours to expel sand. Remove clam and rinse under running water, drain and set aside.
把盐加入水,将啦啦/蛤蜊浸泡在水里2小时,然后用清水冲洗干净,备用。


2. Add water in Song Cho Ideal Wok until half full, bring to the boil over high heat. Add in clam. When most clams have opened, remove from heat. Discard any unopened clams. Break off and discard the top shells of the opened clams. Set aside.
松厨IDEAL万能锅加入半锅水,大火煮滚。加入啦啦/蛤蜊。当大部分的啦啦/蛤蜊打开后,熄火。待凉一些就把啦啦/蛤蜊的上壳去掉。没开的啦啦/蛤蜊丢掉。


3. Heat some oil in Song Cho Ideal Wok, add shallot, garlic, ginger and chili, fry until fragrant. Stir in clams, add oyster sauce and wine. 
烧热油,加入小葱头,蒜头,姜和辣椒,爆香。加入啦啦/蛤蜊,翻炒。然后加入蚝油和酒。拌炒。


4. When the sauce is thicken, stir in spring onion. Remove from heat and serve right away.
收汁,加入青葱碎,拌均。即可享用。若喜欢我的食谱,可以LIKE和追随我的面书专页,不要错过最新食谱发布。
If you like my recipe, click hereLIKE & follow Miki's Food Archives facebook page to receive more recipe updates. Don't forget to change the setting to 'SEE FIRST' if you wish to see my post on your Facebook news feed. Enjoy!


~ Special thanks to Song Cho Singapore ~ 


Some feedback from those who have tried this recipe:

Feedback from Esin Chua

By Esin Chua

By Corrine Tpw

By Corrine Tpw

Feedback from Corrine Tpw